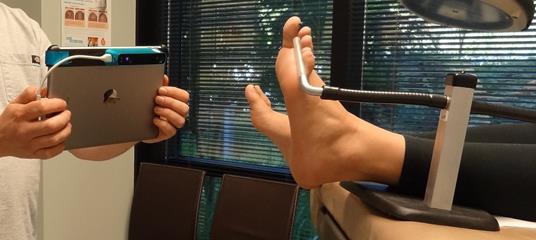
Virtual-Foot™ Imaging System and Ortho-Pose™ Foot Positioner
The
Virtual-Foot™ Imaging System is a method for obtaining foot
impressions for fabrication of custom foot orthotics.
The following
components have been integrated to develop the system:
¨ iPad™
tablet computer
¨ Structure Sensor™ 3D structured light scanner
¨ AOMS TOT™ scanning
software by Sharp Shape
¨ Ortho-Pose™ Foot Positioner
This
combination of technology creates an economical, compact, highly
portable, simple, high definition wireless hand held foot scanner
system.
Major benefits
of the Virtual-Foot™ Imaging System are:
¨ Improves clinic efficiency,
saves time/money
¨ Simple to use
¨ Provides the lab with a
perfect digital model of the foot resulting in higher quality orthotics
¨ Eliminates messy, costly, time
consuming plaster/STS casting and shipping
¨ Eliminates handling, shipping,
expense & environmental impact of foam impression boxes
¨ Quicker orthotic turn-around
time
¨ Improves treatment outcomes &
patient satisfaction
¨ Easy to move from room to room
& clinic to clinic
The Ortho-Pose™ Foot Positioner
is a new device
that holds (poses) a persons’ foot in the non-weightbearing subtalar
neutral position
and
holds the first
ray in a maximally plantarflexed position while obtaining scan images
required for fabrication of custom orthotics. This device also allows
the practitioner to capture an image of the posterior aspect of the heel
in order to allow frontal plane (rearfoot to forefoot) balancing.
The Ortho-Pose™ Foot Positioner
does
not apply pressure to the 5th metatarsal head area which deforms that important contact
area. The sulcus bar fits ergonomically into the sulcus space just like
a practitioners’ thumb is placed when holding the foot to take a plaster
cast. Maintaining the natural surface
topography in this area is
critical for proper biomechanical design and fabrication of functional
orthotics.
Tips
on Using the AOMS TOT System
Without using an Ortho-Pose Foot Positioner, one person needs to operate the iPad AOMS TOT scanner while another person positions the patients' foot.
The person positioning the foot should be on the left side of the patient when holding the left foot. And on the right side when holding and scanning the right foot.
Grip the foot by using the left index finger under the 4th & 5th digits
and the left thumb on dosal aspect of the digits for the left foot.
Use your right hand when you position and scan the right foot.
Do not apply pressure directly beneath the 5th metatarsal head in lieu of grasping the 4th and 5th digits. Otherwise you will distort the 5th metatarsal head topography which is a critical landmark in orthotic fabrication.
Of course the person
holding the foot needs to be at the side of the extremity and not
between the foot and the scanner.
Some practioners
will either dorsiflex the hallux or put downward pressure on the dorsal
aspect of the 1st metatarsal head in order to place the forefoot in
correct positition relative to the rearfoot.
Start the AOMS TOT
app (program) on the iPad.
Enter the name and select either left or right.
Aiming Mode:
Hold the iPad so that it is on the same plane as the plantar aspect of
the foot.
The iPad should be held about 20” from the foot. Move the iPad until the
foot is inside bounding box on the screen.
Make minimal alignment changes until a flickering reddish layer covers
the surface of the foot.
You may have to move the iPad closer or farther away, tilt it up or down
or angle it from left to right or right to left.
You need to start by aiming at the plantar aspect of the foot. BEFORE
YOU TAP THE SCAN BUTTON, LINE THE SCANNER UP WITH THE BOTTOM (PLANTAR
ASPECT) OF THE FOOT.
Once the reddish layer is covering the surface of the foot, tap the Scan
button on the screen. Give the scanner time to apply the white “plaster
layer”.
Slowly and smoothly move the iPad medially to capture the medial aspect
of the foot. Then move to the lateral aspect of the foot and then to the
posterior aspect of the heel.
It is critical that you capture the posterior aspect of the heel. That
allows us to balance the forefoot to the rear-foot when we are doing the
cast correction in the lab.
Tap RESTART if you see “holes” in the “plaster” or if you loose the
bounding box.
Once all surfaces of the foot are covered with the white “plaster”, tap
the DONE button to end the scanning mode.
View the scan/image on the screen to verify the quality. If you are not
satisfied with the scan, tap the BACK button and continue to scan again.
Then tap Save. The email window will pop up. Verify the info and then
tap the UP arrow. That sends the scan file to the lab via email.
Then tap: Back.
Then tap Continue and enter either left or right (obviously the opposite
foot from the first scan).
Repeat the above starting with the aiming mode.
To force quit on the AOMSTOT app, double click the iPad Home button, in
the app switcher, swipe up on the app.
Even though you click Send and hear the swoosh sound that the scans are
sent, the email does not actually get sent if the sender’s and or the
receiver’s emails are not configured correctly &/or the sender’s wifi is
not connected.
So, if you get a message from the lab that your scans have not been
received and you are sure you “sent” them, go to your email box and see
if it is in your “sent” folder.
If it is not in your sent folder, look to see if you have “Outbox”
showing and if the email is in there. If so, resend the email to the lab.